How to Remove Roller Brush from Shark Lift-Away Vacuum: A Step-by-Step Guide
by
Tomasz David
The roller brush in your Shark Lift-Away vacuum plays a crucial role in deep cleaning carpets and other surfaces. Over time, it can accumulate hair, dirt, and debris, impacting the vacuum’s performance. Regularly removing and cleaning the roller brush is essential for maintaining optimal functionality. If you're unsure how to remove roller brush from Shark Lift-Away vacuum, this guide will provide step-by-step instructions on safely removing the brush, cleaning it effectively, and troubleshooting common issues that may arise. By following these tips, you’ll improve your vacuum’s efficiency and extend its lifespan, ensuring it continues to deliver excellent cleaning results.
Why Should You Remove the Roller Brush from Your Shark Lift-Away Vacuum?
Regularly removing and cleaning the roller brush is essential for several reasons. Firstly, it ensures the vacuum operates at its best. Over time, hair, string, and debris can clog the roller brush, diminishing suction power. This buildup forces the vacuum to work harder, potentially causing overheating and motor damage. Secondly, maintaining a clean roller brush extends the vacuum’s lifespan. Proper care prevents wear and tear, saving you money by reducing the need for repairs or replacements. Lastly, cleaning the roller brush improves home hygiene. A dirty brush can spread dirt and allergens, reducing the effectiveness of your cleaning efforts. By keeping the roller brush clean, you ensure a healthier living environment. In conclusion, routine cleaning of the roller brush not only boosts performance but also promotes a longer-lasting vacuum and a cleaner, healthier home.
Step-by-Step Guide to Removing the Roller Brush
Safety First: Unplugging the Vacuum
Before you start, ensure that the vacuum is unplugged. This simple step is crucial for your safety, as it prevents any accidental activation of the vacuum while you’re working on it. Unplugging the vacuum eliminates the risk of it turning on unexpectedly, which could lead to injury or damage. Taking this precaution will give you peace of mind as you perform any maintenance or repairs. Always remember to unplug the device first!
Locating the Roller Brush Access Panel
To locate the roller brush access panel, first, flip the vacuum upside down. You will see the bottom plate that houses the roller brush. This plate is typically secured with screws or clips that need to be removed before accessing the roller brush. Make sure to carefully unscrew or unclip the plate to avoid damaging any components and to reach the roller brush for cleaning or replacement.
Removing the Access Panel
Using a screwdriver, remove the screws or unfasten the clips that secure the access panel. Be sure to keep the screws in a safe place, such as a small container, to avoid losing them. Once the screws are removed or clips are undone, carefully lift the panel off, revealing the roller brush inside. Take care not to damage the panel or surrounding components during this process.
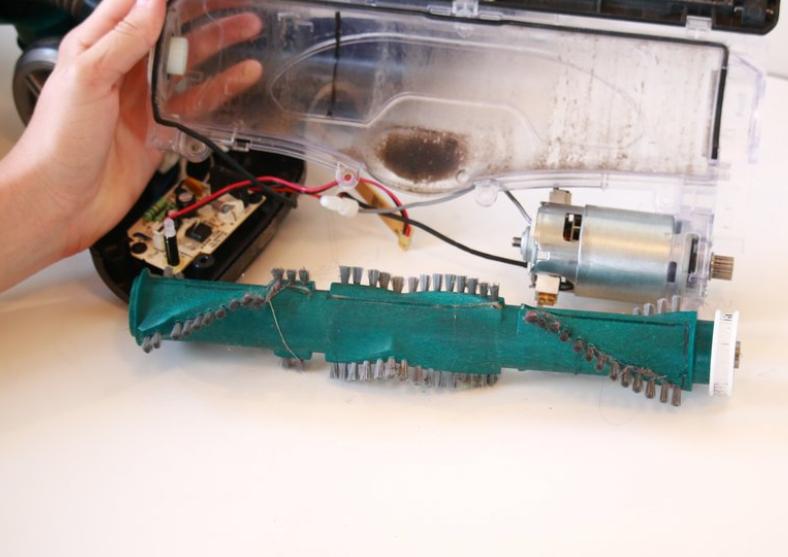
Detaching the Roller Brush
With the access panel removed, you can now see the roller brush. It’s held in place by a series of mounts or bearings. Gently lift one end of the roller brush to dislodge it from its mount. You might need to wiggle it slightly to free it completely. Once one end is free, you can easily pull the brush out of the vacuum.
How to Clean the Roller Brush
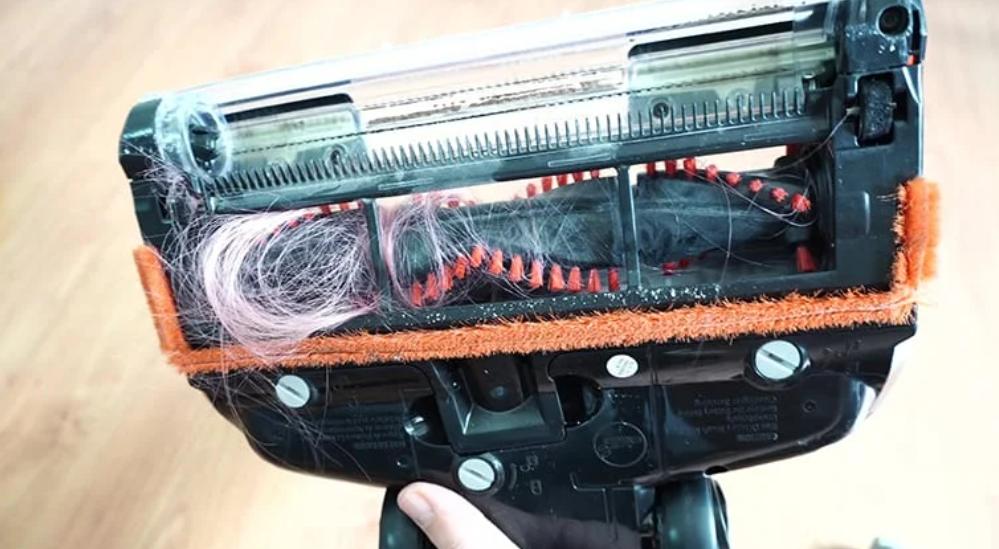
Removing Debris and Hair
To clean the roller brush, begin by removing any visible debris and hair. Use scissors to carefully cut through any hair wrapped around the brush and gently pull it away. Take your time to ensure all tangled materials, such as hair, dust, and fibers, are removed. Make sure to clean the brush thoroughly to maintain its performance and avoid clogging, ensuring your vacuum functions efficiently.
Reassembling the Vacuum
Once the roller brush is clean, it’s time to reassemble the vacuum. Carefully insert the roller brush back into its housing, making sure it fits securely into the mounts or bearings. Replace the access panel and fasten it with screws or clips to hold it in place. Before you finish, double-check that everything is tightly secured and properly aligned, ensuring the vacuum is ready for use once it is turned upright.
Troubleshooting Common Issues
Dealing with Stubborn Debris
Sometimes, debris can be stubborn and difficult to remove from your vaccum. To clean it thoroughly, use a toothbrush or a soft-bristle brush to gently scrub away any remaining dirt. For more persistent debris, a mild soap solution can be helpful to break it down. However, always ensure the roller brush is completely dry before reassembling to avoid moisture buildup, which could potentially damage the appliance over time.
Ensuring Proper Reassembly
If the vacuum doesn’t perform as expected after reassembly, start by checking if the roller brush is correctly seated. A misaligned brush can significantly reduce suction power and may cause damage to the vacuum. Additionally, ensure all screws and panels are securely tightened, as any loose components can negatively impact the vacuum's performance. Proper alignment and thorough reassembly are essential for maintaining optimal operation and extending the vacuum's lifespan.
Conclusion
Maintaining your Shark Lift-Away vacuum by regularly cleaning the roller brush is key to ensuring optimal performance. If you're unsure how to remove roller brush from Shark Lift-Away vacuum, following our step-by-step guide will help you easily remove, clean, and reassemble the roller brush, keeping your vacuum in top condition. Regular maintenance not only prolongs the life of your vacuum but also ensures a cleaner and healthier home environment. Remember, a well-maintained vacuum is more efficient and effective, making your cleaning tasks easier and more thorough.
FAQs
How often should I remove and clean the roller brush?
It’s a good idea to clean the roller brush at least once a month. If you have pets or notice a drop in vacuum performance, you might need to clean it more frequently.
Can I use water to clean the roller brush?
Yes, you can use water to clean the roller brush. However, ensure the brush is completely dry before reassembling to prevent any damage to the vacuum.
What should I do if the roller brush is damaged?
If the roller brush is damaged, it’s best to replace it. You can order a replacement part from Shark’s official website or a trusted retailer. Replacing a damaged brush is important to maintain the vacuum’s efficiency and prevent further damage.

Leave a Comment